
Introduction
The best SSH implementation for Windows is, as far as I know, putty. Its usability, quality, ease of use etc. is good. You'll need to download the programs putty, pageant, puttygen and plink from its homepage.
Generating your keys
First, start puttygen:
We'll be using it to generate your public and private key, which will be used for authenticating with the SSH based CVS server/repository.
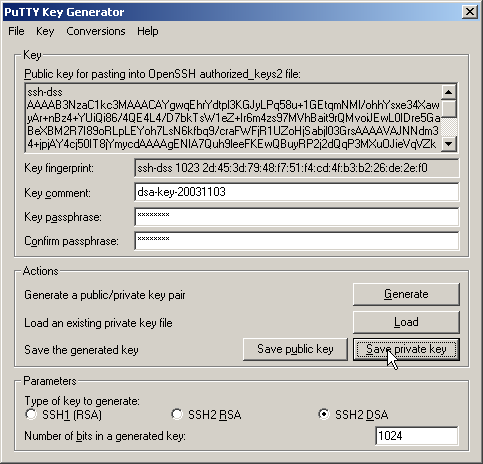
First, click "SSH2 DSA" to select a proper SSH2 based key (SSH2 is more secure than SSH1), then click "Generate" to have your key generated. You'll be asked to move the mouse pointer around on the window, which will give the program some initial random data to chew on. Then, type in a secret passphrase (password) in the "key passphrase" textbox and repeat it in the one below. Keep this for yourself. It should be a good password with random characters (uppercase and lowercase), and should also contain numbers. Then click "Save private key" and pick a safe location (you are storing your private key, the secret part of your key), a place where it won't be tampered with or used by unauthorized personnel. Also select the public part of the key ("Public key for pasting into authorized_keys2 file"), right-click and copy the contents to your clipboard (actually, authorized_keys2 is misleading, OpenSSH went back to using authorized_keys for SSH2 keys also, so use authorized_keys and keep your OpenSSH up to date). Then, either do:
a) If you're using SourceForge.net, go to your SF Account options page: http://sf.net/account (you will be asked to log in if you haven't done it before). Then find the "Host Access Information" part. Next to a "Number of SSH Shared Keys" statement below you will see a number (0 if you haven't used SF before). Click the "Edit SSH Keys for Shell/CVS" link, and you will be redirected to a page with an editing box. Paste the public key you have copied from puttygen window (below "Public key for pasting into authorized_keys2 file") - be careful to copy all characters of the key. The key mustn't also be split in the editing box - it should be visible as a single line. After pasting click the "Update" button. If you've done everything properly, the "Number of SSH Shared Keys" will increase by 1. Note that the internal part of the update performed at SF takes a while, so you might have to wait up to 30 minutes before you will be able to connect to SF with this key.
b) If you're already familiar with ssh, log in on your CVS server (if you're allowed to do that) and paste the contents of your public key in ~/.ssh/authorized_keys in one line. Chmod the file to mode 0600.
or
c) Send your public key to your CVS administrator by mail and let him put it where it should be.
NB: Make sure it is your public key your are authorizing and copying around, you must keep your private key secret. Also, consider using from= and other measures in your authorized_keys files to limit the access for this authorization (see the sshd man page for more information).
Using pageant, the SSH key authentication agent
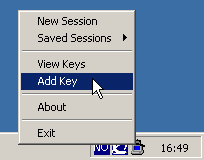
Pageant is your friend. It will do your authentication so you don't have to type password for every CVS operation. First, start it:

Next, rightclick its new icon in the tray, and select add key:
Locate your private key, and type inn the passphrase you used when generating the key with puttygen. That makes it possible to log in directly to your CVS account without typing passwords. This may be a security problem, please make sure you read this document entirely -- there are security considerations you need to know in the end of it.
Oh, and, you need to repeat this step, starting pageant, and adding your key for every time you want to use this type of SSH authentication. But you only need to do it once for each time you log in.
Creating a putty saved session for WinCVS to use
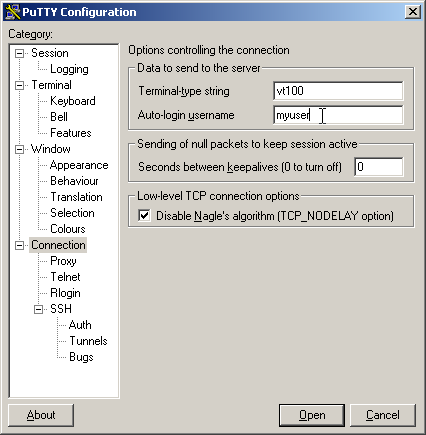
Start putty:

Walk down to the Connection category, and under "Auto-login username" under "Data to send to the server", type in the (SSH) username you wish to use on the CVS server:
Then go to the SSH section in the Connection category, and locate your private SSH key that you generated using puttygen:
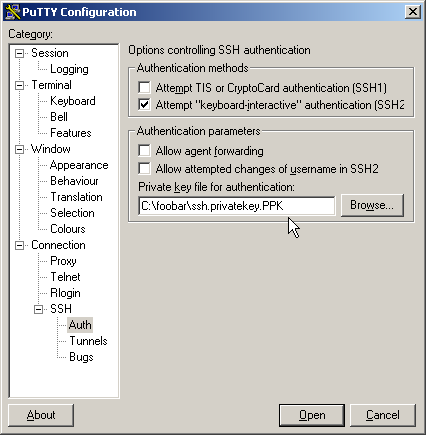
[added by akavel:] In the SSH section select the SSH version your key is generated for - if you used SSH 2 DSA, select "Preferred SSH protocol version:" as 2.
Go back to the Session category, type in the hostname of your CVS server, choose SSH as protocol, type in a session name, and click Save:
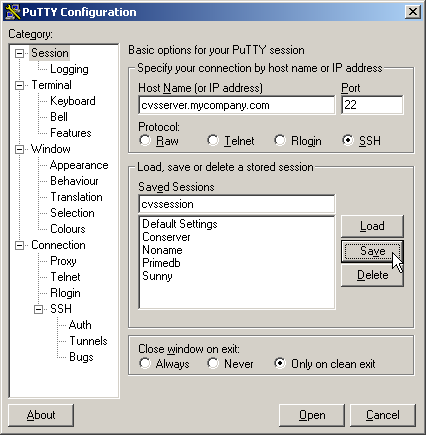
Then test it by double-clicking the session name from the list of "Saved Sessions". Your login should then work automatically, without asking you for a username or password. If it doesn't, you need to go backwards in this guide and see where you did something wrong:
If it works fine however, exit putty and continue.
Using WinCVS with your new SSH setup
I assume you have already installed a recent version of WinCVS downloaded from www.wincvs.org. As I write this, I am currently using WinCVS 1.2. Start it.
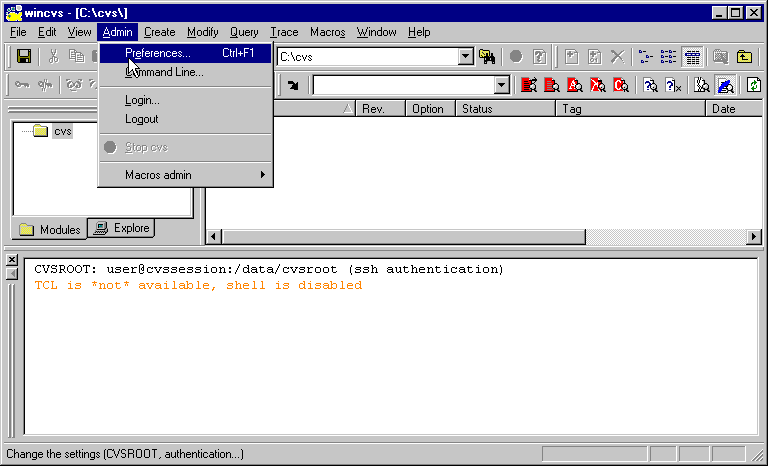
Click Admin/Preferences.
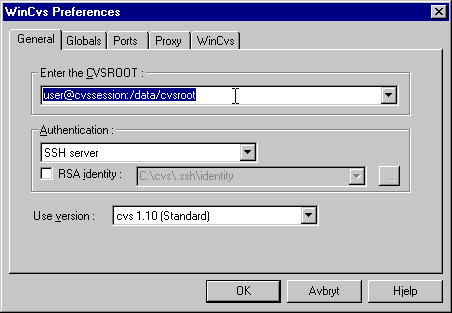
Type in the CVSROOT. It should be your username, @, the SSH session name you stored in putty, a colon, and the path for the CVS repository on the CVS server. Select SSH server for authentication.
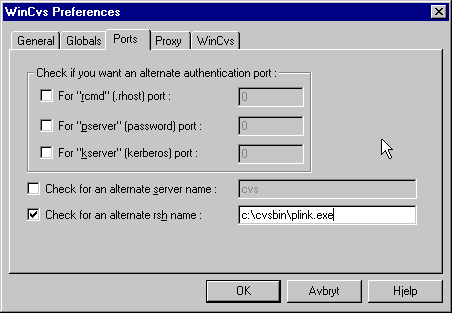
Click the Ports tab, check the checkbox for "Check for an alternate rsh name", and type in the full path for your plink program (downloaded from the putty pages). Click OK. This is it. You should be able to check out files and work with WinCVS as normal. Securely (authenticated and encrypted), too. You do not need to use Login and Logout on the Admin menu, putty and friends do that stuff for you.
Additional information
As you can see, this document does not attempt to explain the usage of WinCVS or CVS in general. Try www.wincvs.org or www.cvshome.org for more information about this.
Security considerations
Feedback
If you have any comments, additions or find anything wrong, please let me know.
For commercial help/consulting on CVS issues, see my consulting business www.bsdconsulting.no.
Also check my CVS page, which intends to be a generally useful page about CVS and related tools.
History
2003-11-04: Updated the page on Putty steps and also some hints on debugging problems. Thanks to Brenda Bell for tips, and Morten Kjelkenes for testing.